
How To Record Zoom Classes – Tips And Frequent Questions
Many teachers want to know how to record Zoom classes. Besides that, there are many questions and tips that yoga teachers have in mind when they go online with Zoom for their yoga classes. Here we have covered most of the tips and frequent questions related to Zoom recordings and online classes.
Also if you are a new or beginner to Zoom then you can find how to record Zoom Classes here.
Q1. Do you need to get noise cancellation on when recording in Zoom?
When you are recording certain audio or video obviously you don’t want the background noise to be heard. Noise suppression as it’s called is a feature in Zoom where you can cancel any such noise while recording your online class.
To get noise cancellation on when recording in Zoom you need to go to Zoom > your profile picture and click on settings.
Under the suppress background noise section, select the level of suppression you wish to use. According to Zoom, there are four options to select:
- Auto: This is the default setting, and will apply moderate background noise reduction when needed. It will auto adjust the aggressiveness for blocking background noise based on what it detects in the background. If music is detected, it will not treat the music as background noise.
- Low: With this setting the noise reduction will be minimal. It will block low levels of persistent background noise. This option will preserve as much of the original sound as possible.
- Medium: This option is best for reducing and eliminating background noise in standard environments, including fans, pen tapping, etc.
- High: High settings noise reduction will be at its most aggressive, and eliminate noise such as crunching of paper or wrappers, keyboard typing, etc.
Q2. How to get noise cancellation on when recording in Zoom?
To suppress the distracting noises for Zoom Classes you need to utilize a noise suppression filter which can help remove distracting noises that are picked up by participants’ microphones and improve audio quality. All the background noise like paper crunching, keyboard typing, fan noise, dog barking, and other noises, will be filtered out to create a better online class experience.
By default, Zoom automatically mutes background noises that are picked up by your microphone; however, the option can be changed to be more or less aggressive based on the environment and use case.
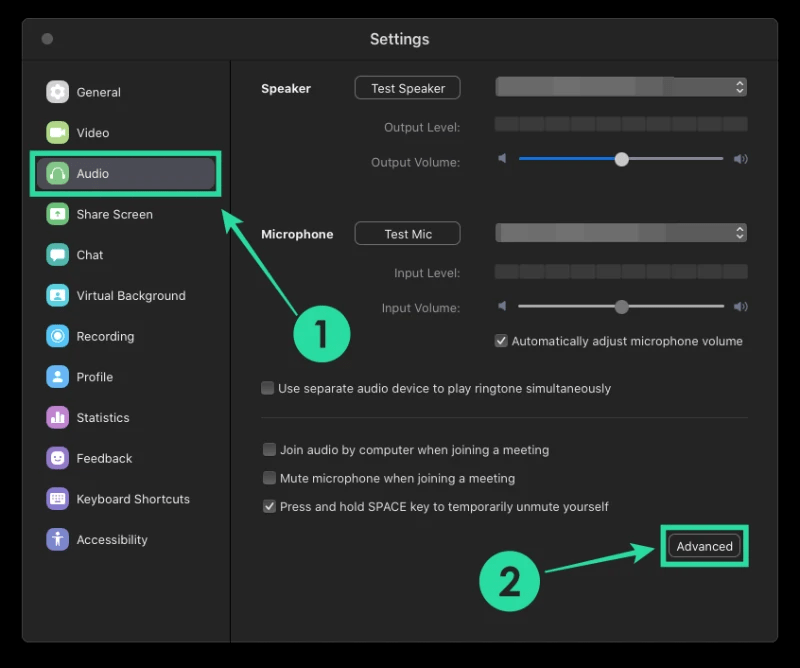
As said above on Zoom click your profile picture, then click Settings. Click the Audio tab and get noise cancellation on.
To achieve high-quality audio, you will need:
- Zoom desktop client for Windows, 5.2.0 or higher
- Zoom desktop client for macOS, 5.2.0 or higher
<<Best Sound System For Yoga Classes>>
Q3. Can I connect Zoom to Facebook Live?
You can stream online yoga Zoom classes with Zoom live on Facebook to your Facebook timeline or a group or page that you are an admin for. This allows your participants to join via Zoom or viewers to watch and comment on Facebook Live.
When attempting to live stream to Facebook, you may find a prompt that says: “This endpoint is deprecated and will not be accessible once the next Graph API version is released. Please use the Live API instead.”
Simply ignore this message, choose where you would like to stream, and click Next.
Zoom will be implementing changes in an upcoming release to ensure there is no disruption to your Facebook live streaming.
Note that Zoom does not support the new Facebook Live Producer. If you see a notification to try to the new Live Producer, click Dismiss.
Also, remember that Facebook changed its API as of April 2018 and now prevents some users from live streaming to groups. If you are unable to live stream your webinar to Facebook, you can configure the Facebook Live stream as a custom service.
Q4. How to connect Zoom to Facebook Live?
Go to your Zoom Account settings and find the option Allow live streaming of meetings located against the heading In Meeting (Advanced).
You are now ready to stream your Zoom online classes to Facebook.
Because you can start the class before going live, it is good practice to ask permission of your students and notify them when you plan to start the broadcast.
- You can schedule the online class as well.
- Also automatically record the online class and decide whether participants join by phone/computer or allow both.
- You send out invitations to register for the class. Those who do register will receive reminders before the yoga class. You could publicly post the invitation link on social media.
- You can see a list of upcoming meetings on your Zoom page. To start online class, press the blue start button.
This procedure will start a private scheduled class and one which will go live on Facebook. You can go live on Facebook when you, as the host, have started the class.
Remember that you and your students download the Zoom meeting software to your desktops or use mobile applications.
When you start, your students can join you on camera.
You have to connect to Facebook and use Facebook’s Creator Studio to enter the details and start the live broadcast on Facebook.
Q5. How to link Zoom Meetings to Facebook?
To link your Zoom meeting to Facebook, follow the steps below:
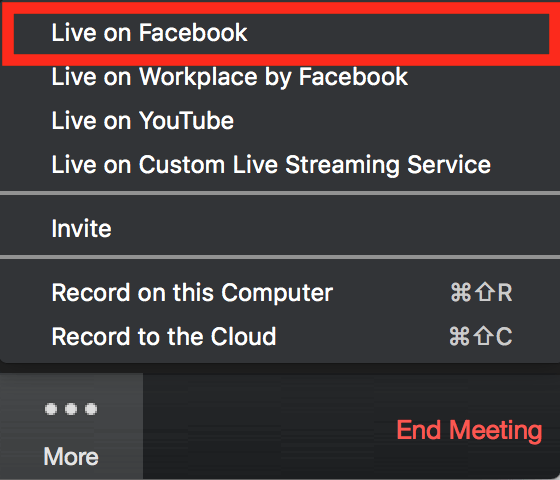
- Click the more button on the right-hand side of the Studio. You can now see Zoom’s public broadcasting options.
- Select Live on Facebook.
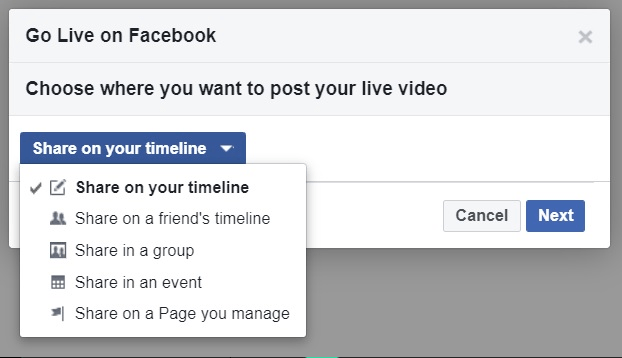
- Then select your destination. A pop-up will appear once you click on Live on Facebook.
- Choose where specifically you want to go live on Facebook: your own timeline, a group or a page.
- After selecting the destination, visit Facebook Creator Studio to add more details. You will be instructed to add a title and optionally a description.
Finally, press the Go Live button bottom left; your yoga online class is now live on Facebook.
With the setup complete, you can now conduct the Zoom Class in the usual way.
Remember besides students your Zoom live class also has viewers on Facebook. Viewers on Facebook can make comments; you have at least two options to handle the comments,
Keep the Facebook tab with the live broadcast open and from time to time, read the comments. Doing this gives rise to two problems; there is additional internet and computer resource requirement. The second is that you, as host, will be distracted; your attention will not be in the meeting room.
Or
You could tell Facebook viewers that you will respond to their comments after the broadcast.
All the action within a Zoom class takes place in the classroom.
Upon completing your live Zoom class, press the red end button bottom right of your Zoom studio. Pressing the button will stop both the Zoom class and the Facebook broadcast; if you recorded the broadcast, it would process and then save to your local hard drive.
<<Find More Frequent Questions And Answers on Zoom Here>>
Q6. How to record classes into Zoom and then upload via a link to your website?
If you want to share your recorded class and upload it to your website then Zoom has this option too for you. For all your recorded online classes they are saved on your computer. You can share this recording with others by uploading it to third-party cloud storage or content/learning management platform such as Dropbox or Google Drive.
What you need is
- Zoom desktop client version 3.5 or higher
- Sign in to the Zoom client.
- Click Meetings.
- Click the Recorded tab.
- Select the meeting or your recorded class you would like to view the recording for and click Open. This will open the folder where your recording files are stored. The MP4 file is the video file.
- If you only see the Open button, the meeting contains a cloud recording. You can visit a cloud storage or video streaming service like Dropbox, Box, Google Drive, YouTube, or Vimeo, and upload the MP4 file.
Note to store a video on Zoom’s cloud, you must use cloud recording. Give your file a unique file name when saving or sharing meeting files, and that you do not use the words Zoom, Personal Meeting Room or My Meeting in the file name.
Q7. How to upload your recordings on YouTube?
If you want to upload your recordings on youtube then:
- Open up a Web Browser
- Log into your email account
- Click on the 9 squares in the upper right corner to open up the list of connected Google Apps
- Scroll down to the Youtube icon and click on it
- You will now be on the youtube homepage attached to your youtube account
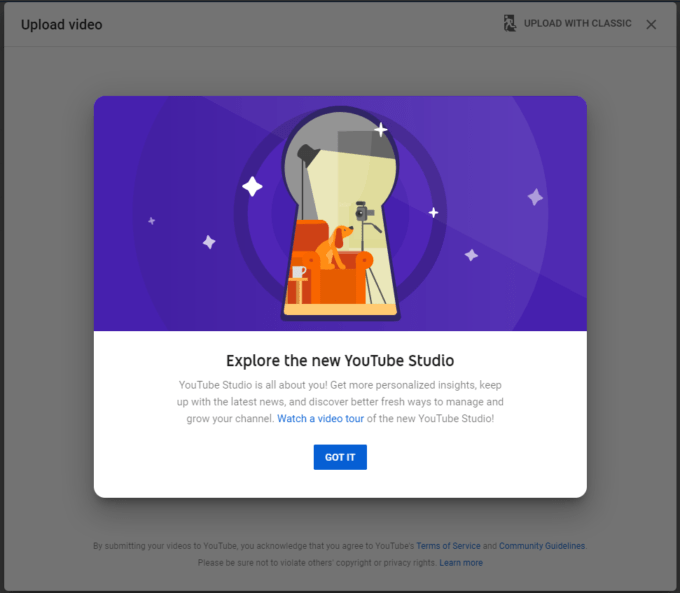
- Click on the Camera icon in the upper right corner
- In the drop down menu under click on Upload Video
Your YouTube information will load and a screen will pop up. You can drag and drop your zoom_0 video file here or click on Select File to find your file through File Explorer or Finder. (Remember you want to upload the zoom_0 file).
Your video will start uploading. On the right side of the screen, you will see your Youtube link. You can click the copy button next to it to copy the link to your clipboard or click on the link itself to open it in a new tab.
As it uploads you can configure your settings for the video.
- You need to give a title to your video and briefly describe your video. You can add dates here to help you sort them later
- On the description tab you can tell your audience or viewers more about your video
- You can create a thumbnail and if you are uploading a large file you can also skip this step.
- You can add your video to playlists if you want to share your content out
- In the Audience tab it will ask is this video made for kids. SImply Click No, it’s not made for kids.
- Finally, you can choose the visibility of your video.Public – everyone on Youtube can see and search for your video. Unlisted – anyone with the video link can see your content and it is not searchable (Recommended). Private – only you and people you choose through your youtube account can see it
You can schedule a date to make your video accessible.
When you are finished click Save in the lower right corner and your content will be saved and available on Youtube.
You will receive notice that your video has been published. Lastly, you can view your video on youtube
Q8. Are Live Zoom fitness classes a waste of time?
The answer to this frequent question depends on the individual yoga teacher. Many think that studio classes are better because one gets real interaction with the yoga teacher and other students in the class. Also as there is no physical instructor close to you to correct your pose or form often either ends up injury or stress. Moreover, online classes are dependent on WIFI and the internet which if streamed with a poor connection cannot offer a smooth class. It’s easy to get distracted, without an instructor or friend there to encourage you. Also, most of the online classes are free and that’s why yoga teachers might say that live Zoom Fitness classes are a waste of time.
Tips to use Zoom for online classes
There are many tips to follow when using Zoom for online classes.
- Ask students to use camera to facilitate the sense of community
- Give time to students to prepare their environment before enabling their video during the session. Thus leabe the “Host” and “Participant” on/off toggles in off position.
- Allow students to use their laptops or call on the phone to connect to the audio. The phone number will be listed in the invitation copied from the meeting summary page, or you can provide it from the session.
- Always use the automatically -generated meeting ID. For security reasons, do not use your Personal Meeting ID for real-time sessions with students.
- When scheduling an online class, select ‘Require meeting passcode. Students will be asked to enter this passcode in order to join your meeting.
- Leave join before host setting disabled. Participants will see a pop-up that reads, “Please wait for the host to start this meeting.” This feature is useful if you don’t want participants to join/interact before the host enters and also helps prevent unintended ‘guests’ from joining your session.
- ‘Mute participant upon entry’ as they join the meeting. Keep this setting enabled to prevent interference. Without this setting enable, participants will join the session with a live microphone.
- Enable waiting room where participants are held outside the meeting room. When enabled, the host (instructor) controls when participants join the meeting and can admit attendees individually, or hold all attendees in the virtual waiting room and admit all when ready to begin.
- Allow ‘Only authenticated users’ to join (only available in Web portal meeting settings) if your participants should log into Zoom to access the meeting. This adds an extra layer of security allowing only your students to log in.
- Avoid ‘Recording the meeting automatically’ This may not be ideal because it will capture any wait time before the meeting actually begins. Manually begin and end the recording inside the Zoom room.
- Establish guidelines and set clear expectations for how students will be managed. Like addressing questions and comments. Discuss online etiquette and expectations. You may need to model, and coach your students on, basic online meeting etiquette.
- Notify students before the class begins if you will be recording the class. Students who do not want to be recorded may choose not to participate. If you are recording the class, be clear with the students about who will have access to the recording and under what circumstances.
- Engage students with Zoom Tools like polling feature, breakout rooms, non verbal feedback, sharing my screen and chat feature.
Remember to take time and answer to the questions of your students. You can ask students to write questions in the chat and pause at regular intervals to answer. Finally, note that for the time being Zoom is the best online software to stream live yoga classes. (Content Source: Zoom and other websites)