We have a variety of class types:
- Standard Studio Classes
- Duo Studio Class
- Mat Classes
- One on One sessions
We would like to create a variety of payment options for each class type.
For example, with a Studio Class you could have the option of purchasing a 5x Class Pass to allow you to do 5x Studio classes at a discounted rate, or you could choose to set up a direct debit subscription and pay weekly for two studio classes per week at a discounted rate.
But the “Pass” or “Subscription” would need to only apply to that class type.
I’ve tried a lot of booking platforms and a lot of them manage their passes like a credit that can be applied to any service, we need something more sophisticated, do you offer this function?
How to add a Pass or Subscription #
Watch the [Video ►] on creating new Passes / Subscriptions
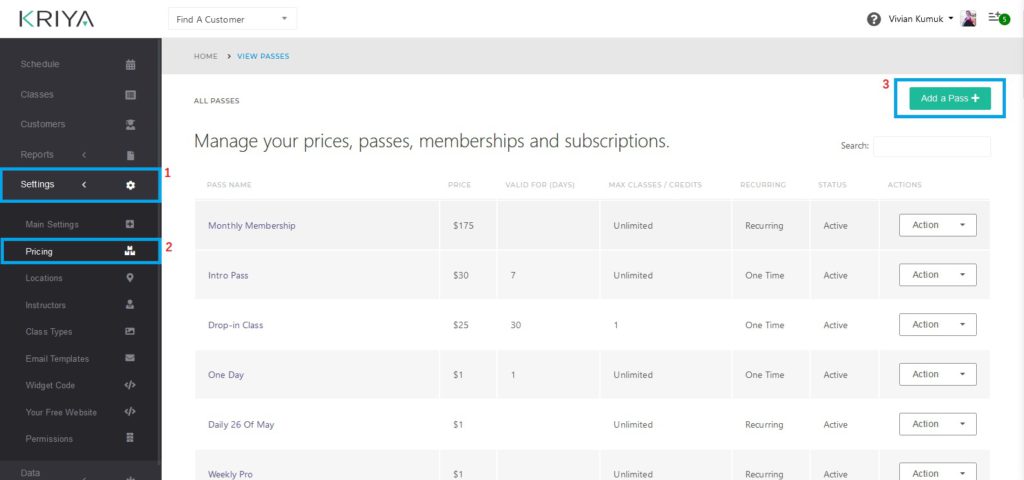
Login to KRIYA, On the main menu select settings and then select pricing. You can view here all the passes. You can now either edit an old pass which is no longer valid or add a new one.
To add a new pass click on Add a Pass button on the top right, which will take you to the Add Pass page.
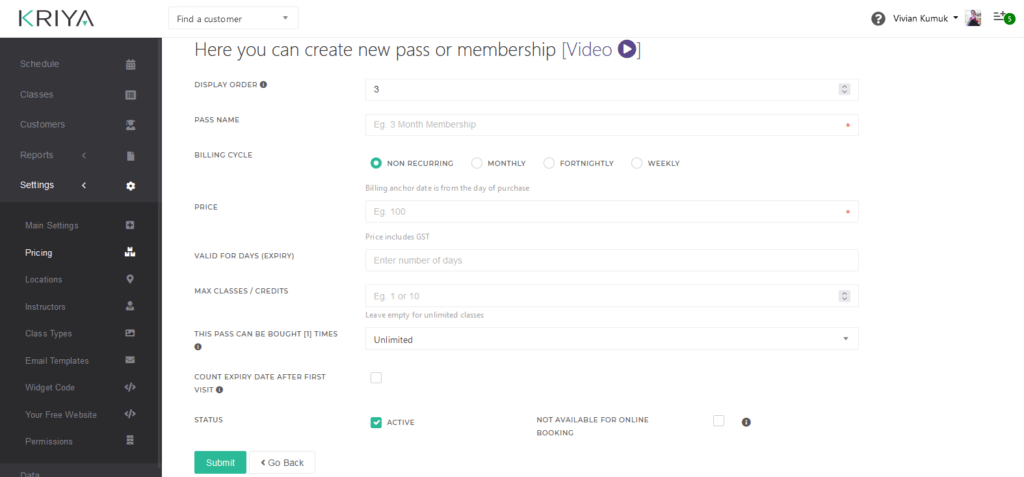
Enter all the details necessary for the pass. For Example Check Points Below :
- Display order : It is the like the Index number on which your pass will be displayed. It auto generated according to number of passes you have. You can change this, but better to leave it as it is.
For example: if you have 12 passes, new pass will show 13 in display order. - Pass Name : Here enter the pass name you want to have, for you to understand quickly what this pass is about. For example : Online Yoga Monthly Pass, which will be a Yoga Class Pass with a monthly subscription, and validity of 30 days, etc.
- Billing Cycle : Select the options according to the pass after which the subscription will be renewed, select “Non Recurring” option if it is a one time pass.
- Price : Enter the pass price in numbers, without any Currency symbol Like “$” , etc.
- Valid for Days : Here enter the number of days for which the pass will be valid, regardless of the usage by the student.
For Example : Enter “30” for 30 days of validity, after 30 days a student will not be able to use this pass for any class, even if he has any number of classes left to attend. - Max Class / Credits : This will give the students the number of classes they can attend with this pass. We can have any number of sessions/class.
For Example : In our monthly pass we could have like 15 sessions, Enter “15” in this case. - This pass can be bought times : Leave it blank, which means students can buy this for unlimited times. Or enter a number for which you can buy this pass.
- Count expiry date after first visit : As the name suggest, a pass will start the validity count from the day the students first attends a class.
For example : If a student buys a pass on 15th Jan, with a 30 days validity. but he attends the first class on 22nd Jan then the pass will expire 29 days after 22nd Jan. - Maximum days allowed for first booking : Selecting the option of count expiry date after first visit, will make this option will get visible.
This will let u set the number of days within which students has to book their first class.
For example : A pass bought on 2nd Jan and max days allowed for 1st booking set to 10, The pass expiry count will start on 12th Jan, that is 10 days after the pass was bought, or if the student books a class within these 10 days. - Status : Checking this option will make this Pass available to buy. Unchecking will cause it to not display anywhere.
- Not available for online booking : Checking this option, the pass will not available online for buying.
Click on Submit to save this pass, you can now view this pass in Pricing page of Settings in Main Menu.
How to add a New Class to your Timetable #
Watch the [Video ►] on creating new Classes on your Timetable
Now that you have Some Class Types and Passes from which these classes can be availed. Let’s see how can we add a Schedule to the timetable so that Students can book into these.
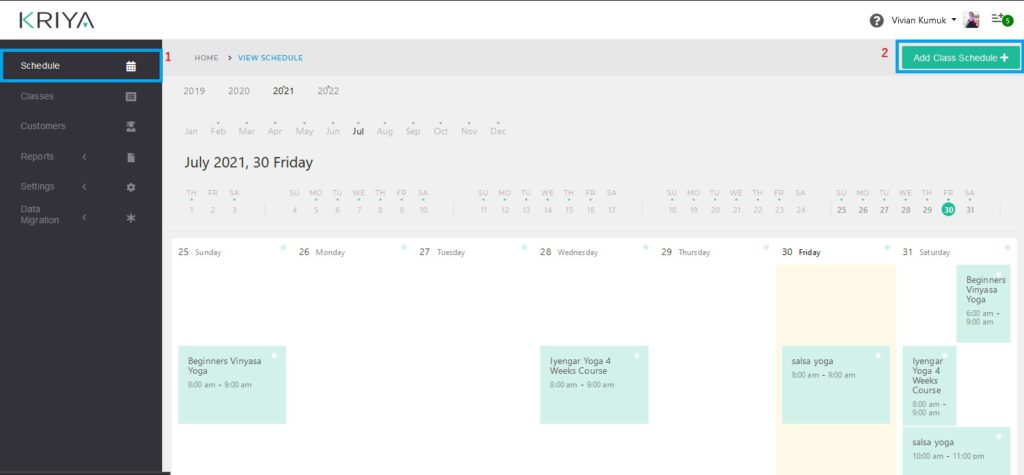
After you are logged into KRIYA. To add a new Class in the Timetable, head to Left Main menu, select Schedule which will open the view Schedule page, Click on Add Class Schedule button. This will take you to Add Schedule Page.
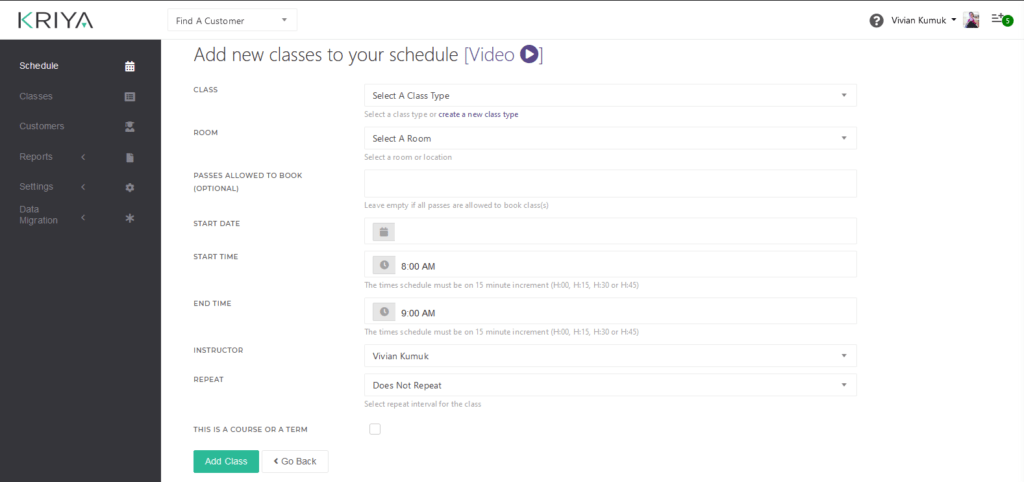
Fill this page to add a new Schedule. Lets understand this in detail, follow below:
- Class : Select a Class type which is available in your Studio. Or quickly create a new class type with the quick link below this Text box.
- Room : Here you have to enter the location detail, where the class is going to be held. You can add more location from Main menu , head to Settings and then Locations.
- Passes Allowed to Book : Select from the list of passes you have , which can be used to book this class.
For example : Daily meditation pass can be used only with meditation type classes and not with Hatha Yoga type Class. - Start Date : Select the Start date of the Class.
- Start & End Time : Select these times to mention the number of hours for which these class will run.
For example : Start Time: 7 am , End Time : 8 am. Indicates a 1 hour session. - Instructor : Select the Instructor/Tutor, who is going to teach in this class.
- Repeat : Select Does not Repeat if it is a one time Session, or else select according to the Class, if it is a weekly class select weekly, etc.
- Every : If you select a repeating in the repeat list, this option will appear.
Leave it blank, if you have a normal weekly or monthly repeating class.
For example : When you select a weekly class , the class will repeat every 1 week, so 1 is auto selected in this option, if you want to like repeat this class every 2 weeks select 2 in here. - Until : Leave this option blank so that the class will repeat indefinitely for 2 years, or mention a date on which this class ends, this is helpful when you want to have some classes as a course for like 3 or 5 months.
Also select the days of the week on which the class will be held.
For example: Students can have a Class every week on Monday, Wednesday and Friday.
Click on Add Class to create this class in the Schedule.