Welcome! Are you ready to experience an efficient and easy way to manage your Business? We have an Intuitive design and clean UI for clutter and lag-free operations.
Users have learned the system’s bare bones in minutes and understand the system in a day. Enjoy your spare time, as the system works in the background.
Watch the Welcome Video below to get a hold of what you are getting into, narrated and guided by the Founder of KRIYA – Frank Pineiro.
Welcome Video Link: https://www.loom.com/share/0aab52dde77a43a7aa886d13f5dd21b0
Understanding the Dashboard #
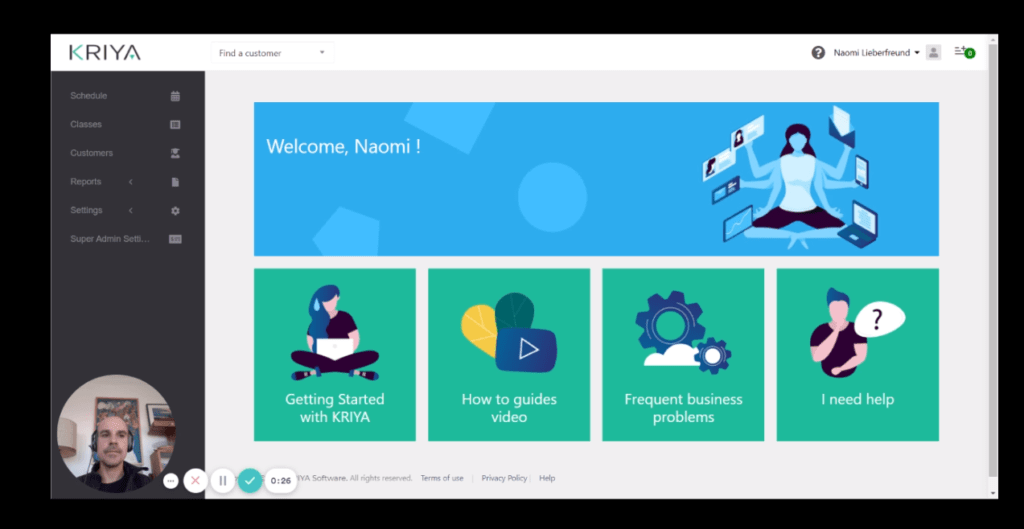
Everything starts when you log in. You can see what the dashboard looks like in the above video thumbnail.
- We have the Main Menu in the left pane.
- Your Name, Profile photo, and notifications are on the top right.
- The guide, video guides, articles link, and help section are in the centre.
Every setting is named according to its function, which leads to easy learning and understanding.
Setup starts with the bare minimum settings needed to run a business. We need to head to Settings > Main Settings.
Main Settings #
In Main Settings, Fill in all the required details, which takes a few minutes.
We have added a Standard Waiver to all accounts. You can change that according to your rules and requirements.
The most Important Setting after the Waiver is the Stripe connection. Connect to Stripe to allow your students to pay online with Credit Cards and more. We recommend it, as it is Fast and Secure.
Learn more about it here: Connect to Stripe
Pricing #
Pricing is a sub-menu under the same Settings Menu. We have to add Pass/Subscription information here.
Head here and click on Add a Pass to add any passes you need to run your business. Enter all the details required for the pass here.
If you need more information, these Help Documents will help you:
a. Adding a Pass.
b. Creating a Recurring Pass.
Later, you can Search, Edit, & Delete them according to your needs.
Promo Codes #
Add codes your customers can use to get a discount when purchasing a pass/subscription. Head here and Add codes and fill in all the other details like date limit – date till which it is valid, Usage limit.
Codes can give them a discount according to Percentage or Cost.
Locations #
Here, you will enter all the details about the locations where you conduct your Business sessions.
Add the Names and addresses of locations with their Capacity. Capacity will determine the number of bookings available at that location. Add more, and edit and delete locations anytime.
Instructors/Teachers #
Add any number of teachers available with you into the system. Add their details, like Medicare Provider Number and other contact and emergency contact details.
Use the Check box to send your instructor a welcome email using the email ID you provided when you save their info into the system.
Class Types #
Types of Classes you offer will go here. Create, Edit and Delete Class Types. Enter the Class Name, like “Intro to Meditation”, Add Description and Credit. Credit is the visit which will be used when a customer attends this class.
We recommend you put the Description now; if you put it after you create a schedule for it, it won’t show in the Class and to the students.
Email Templates #
We define templates per-defined according to the standards. These include Customer welcome, Purchase, and Booking Emails.
The system generates emails when booking, purchasing, and signing up are made. Essential details and templates are added to the bottom of those emails because you may want to give more info and take care of your valued clients.
We have completed most essential settings, so let’s head to creating the schedules.
Schedule & Classes #
The schedule is a Graphic Time table showing the Classes according to their times in a column for the coming 7 days. The Classes will show the same data in a tabular form.
The Class Types you created will be added here as a Time Table, so it is essential to do all the settings properly until we are here.
Head here and Click on Add Class Schedule. Enter the class type, timing, and repeating/recurring: online booking availability. Passes are allowed to use this class type.
Recurring classes will be scheduled straight for 2 years automatically. You can Edit, Create more and Delete these schedules. Editing a Class Schedule can bring changes into a single class / to all the future courses / all the classes of that series.
Website / Widget #
Now, we are in the final step of accepting client bookings. We Need to head to Settings > Main Settings > Widget Code.
The widget will be the one you have created in the Schedule, and now you will find a link here to share it with your clients. You can either link to or include the widget code on your website.
Your clients/students can sign up, Purchase, Book, and edit their profile there.
Support #
We always need a helping hand in new waters. Our Help Docs do that for you. Learn about our system in depth to handle it like a pro.
If you still need an actual human to understand your needs & queries, we have one of the best in the industry Support Team, which will help you through Emails and more.
Contact us at: support@kriya.com.au


